Showing posts with label craft. Show all posts

Quilting Project

After Christmas last year, 4 girls decided that we wanted to make our own quilt. And so, we went to book some lessons and bought some clothes. Thankfully, 4 of us can form a class and we don't have to follow a fixed schedule. Initially, the teacher estimated that we would need 5 lessons, but we ended up finishing our quilt after 7 lessons.

Even before our first lesson, we had homework to do, which was to wash all the cloth and iron them. We need to pre-wash the cloth before cutting and sewing them. This is to prevent them from getting out of shape after piecing them together.


For the design we plan to make, we need 1 yard of white cotton cloth and 9 pieces of fat/long quarters (cotton).


Lesson 1 - Cutting
We were taught how to measure and cut the clothes into stripes. And that's all we managed to achieve after 2.5 hours (super not efficient at all).


Lessons 2 & 3 - Patchwork
Next, we sew together the stripes of different lengths. The short ends are joined together first, forming the long horizontal stripes, which should (theoretically) be of the same length. But as you can see from the picture below, they are not. Thus, when we pin the long sides before sewing, we need to pin the most right and most left ends first, then work towards the center. And when we sew the long stripes together, we should sew rows 1 and 2 together (let's call this piece A), then sew rows 3 and 4 (B), then rows 5 and 6 (C), then rows 7 and 8 (D) and so on until we reach the last row at the bottom. After that, we sew pieces A and B together, and pieces C and D together, etc. We do this until all the stripes are sewn together.


Homework: Trace the applique outline on the freezer paper and prepare the cloth for the applique (see picture below). Our applique design have stripes of different fabric prints.


Lesson 4 - Applique
Iron the freezer paper cut-out onto the back of the applique cloth. Cut the cloth along the edge of the freezer paper, leaving a small allowance. Fold and iron down the cloth edges, then use big stitches to keep them in position. Pin and sew the applique to the main patchwork. As you can see from the rightmost photo, we were told to start sewing from the curve of the applique. When we are almost back at the start point, we remove the big stitches (that were meant to hold the edges folded in). Then we remove the freezer paper through the small opening. Finally, we close up the opening, which in our case is between the two pins at the right-bottom of the balloon. It's easier to sew up the opening along this straight part of the balloon. The applique would easily go out of shape if we try to sew the last part along the curve. We repeat the same steps for the brown basket.


Lesson 5 - Basting
The ropes of the hot air balloons were sewn with two strands of cross-stitch threads. As for the technique, I've already forgotten how it should be done already. Once all the appliques are attached, we can go on to do basting. We lay the patchwork (facing up) on top of the minky (facing down) and we use safety pins to keep the two layers in place.


Lesson 6 - Quilting
We did machine quilting by sewing along the ditch where fabric pieces are joined (only the ditch on the two sides, not those between the white pieces). We also did quilting along the outline of the applique and some clouds on the remaining white spaces.


Lesson 7 - Binding
The very last step in this project is to make the bias tape and bind it on the perimeter of the quilt. With the quilt lay open on the table, ensuring that the corners are right angle, we cut off the extra cloth and minky on the sides. My bias tape was made from 1/2 yard of grey cloth, but again, I totally cannot recall the steps on how to do it now. But there are plenty of tutorials and videos to re-learn if I want to do another one. The bias tape is machine sewn on the front of the quilt, while hand-sewn on the back.

My final product!

This is just a sketchy overview of "how to make a quilt". There are definitely many details and tips that I've missed out here. From our first lesson to my very last stitch, I took 2.5 months to complete this project. Quilting is not just time-consuming, the tools are quite costly too. Definitely going to work on a simpler quilting project next time!

PaperMarket SG51 Paper Terrarium Workshop


This is how KB and I spent our Saturday afternoon to celebrate SG51 National Day - at PaperMarket's 'This is Home' workshop.


Items provided at the workshop


We started with a lot of cutting


This is the center-piece which is to be folded and glued into a 3D HDB block.


The final step is to assemble and glue all the pieces together.


My final product

Quilling Workshop


The first time I encountered paper quilling was through a post on Facebook that introduced Sabeena's paperart on Instagram. It seems like quilling art had been around for a very long time, and it's gaining popularity in recent years.


My first quilling workshop (beginner class) was taught by Priyanka. All these materials were provided and the tools (slotted tool and circle stencil) have to be returned at the end of the lesson.


These quilling papers were provided.


First, tear the long strip of paper into half. Then, use the slotted tool to roll the paper. Place the rolled paper into the circle stencil to achieve the correct diameter, so that all the flower petals will be of a consistent size. Finally, glue the end of the paper strip and pinch it to get a teardrop shape.


Assemble six petals and we get a flower.


My quilling photo frame (which took me almost 2 hours to make)

Soap Making at Soap Ministry

KB and I went for the basic, intermediate 1 and intermediate 2 workshops at Soap Ministry. Their soap making workshops only involves the "melt and pour" technique, not the cold process or hot process kind of procedures that typically begin from vegetable oil.


The basic workshop was really easy. We start by cutting the block of soap base into small pieces and melt them over boiling water. After that, we add glycerin, vitamin E and essential oil (or fruity scent) into the liquid soap base. Then, we pour a small amount into a cup and add colour. Finally, we pour the mixture into mould, let it cool and solidify. When the soap has harden, it is removed from the mould and the product is done. There are two types of soap base. The clear one is the basic soap base and the white one is goat's milk soap base.


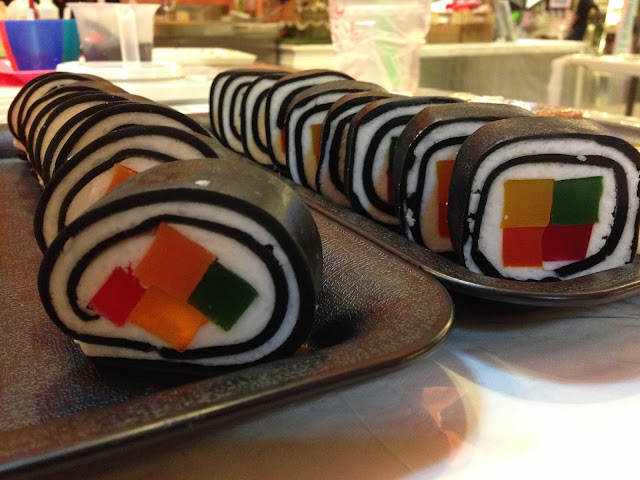
The intermediate levels, however, requires a lot more patience and skill. In level 1, we learnt to make a soap within a soap. We also learn to add colours onto a uni-colour soap, such that the product is no longer monochrome. In level 2, we made sushi soap using a method that is pretty much like how one would make the real sushi. We also made other food items.

DIY 2R Paper Photo Frame

My Martha Stewart craft punches that I've ordered from Amazon arrived last night! As compared to the local scrap-booking stores, the price is approximately halved when I buy from Amazon (now that there is free shipping for purchases above USD 125). While there are already paper photo frames being sold in stores, I couldn't find the ones for 2R-size photos.


This is how I make my 2R photo frames (6.6cm by 11.5cm):

Using the Marvy Uchida Clever Lever Extra Giga Craft Punch (product code: LVXGCP_64 for the rectangle punch), make a punch off-center, as shown in the picture. I've used a 4 1/2" by 6 1/2" (11.5cm by 16.5cm) paper. The punch out is 4.4cm by 7.6cm.
Using the Martha Stewart Crafts Scoreboard, score two lines at 5/8" and at 3 1/4" as shown in the picture.
Cut off the 1.5cm of excess length.
Fold the paper along the scored lines and stick the corners together as shown in the picture. I've chosen to use the double-sided tape, which is easier and cleaner. Leave one side untaped so that the photo can be slided in through this opening.
I used the Martha Stewart Crafts Trains Edger Punch and made a paper ribbon. After punching along the edge of a paper, cut off at 1.5cm at the base of the punched out trains to form the ribbon.
The paper ribbon has to be longer than the width of the frame, so that the ribbon can be folded to the back of the frame. I used small pieces of double-sided tape to hold the ribbon in place, at the back of the frame. Alternative, uhu glue works too.
Finally, add more embellishment according to your likings. Insert a 2R photo from the opening at the top and it's done!


Here are the other designs that I've done by varying the decorations at the bottom of the frames.